
CLIPCHAMP TIPS AND TRICKS
In this step-by-step tutorial, learn the essential tips and tricks for editing videos with Microsoft’s Clipchamp. You’ll learn how to convert text-to-speech and how to customize the voice, how to record your screen and webcam at the same time, how to replace a green screen with an image or a video, and many others. Whether you’re a beginner or an experienced video editor, this video will teach you all the essential Clipchamp video editing tips and tricks that you need to know.
INSTALL CLIPCHAMP
- There are multiple methods to install Clipchamp including:
- Install from clipchamp.com website:
- Visit clipchamp.com and select the “Try for Free” button.
- Select your authentication model (Microsoft account, email or Google account)
- Run through the prompts and you will be able to use the video editor.

- Install from the Windows Store:
- Open the Windows Store.
- Search for “Clipchamp”.

- Select “Clipchamp VideoEditor” and select Open to use the application.
- Install from Windows search bar
- Open the Windows search bar.
- Type in “Clipchamp”
- Select “Clipchamp – Video Editor” and Open the App.

- Install from clipchamp.com website:
TEXT TO SPEECH
Clipchamp allows the conversion of text to speech in multiple languages.
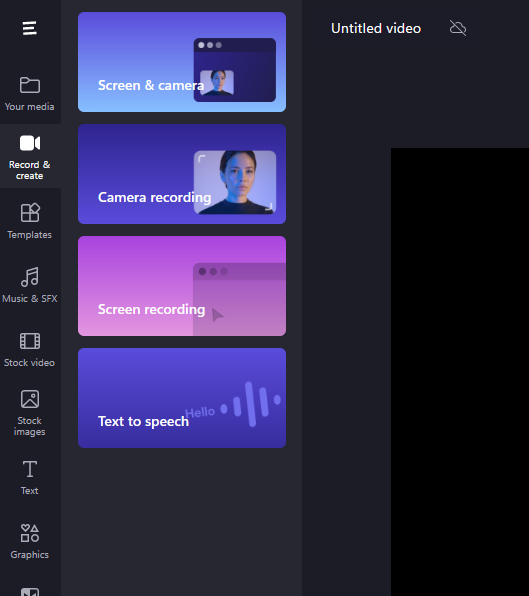
- Open Clipchamp
- Select “Record & Create” option on the left hand navigation
- Select “Text to Speech” to open the dialog
- Select the Language, Voice Actor, Voice Style and Speech speed for your speech.
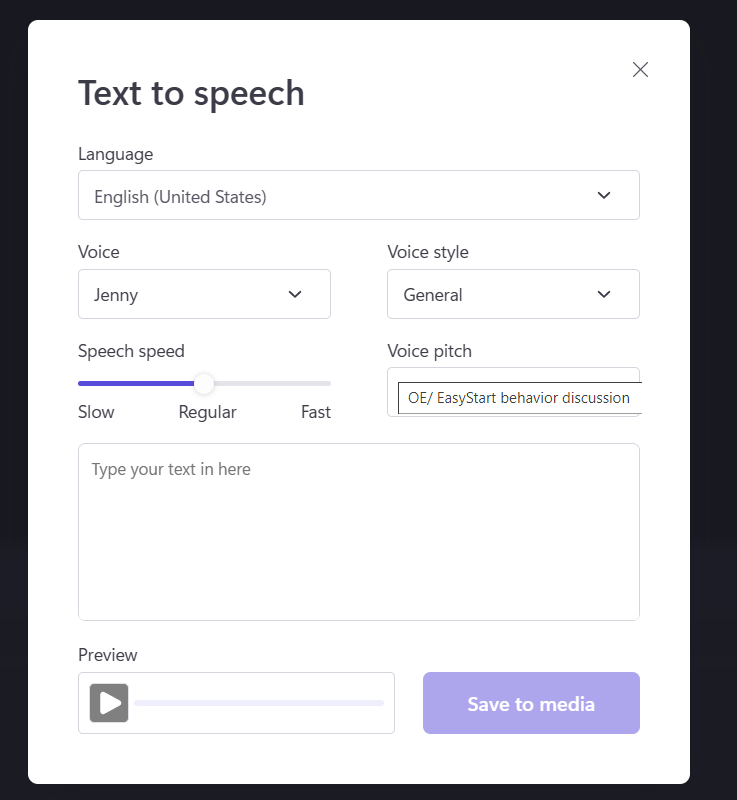
- Enter in your speech text.
- Preview the speech by selecting Preview.
- Save the speech file with the “Save to media” option to save it to your Clipchamp media so you can use it in your video.
IMPORT MEDIA FROM PHONE
Clipchamp makes it easy to import files from your phone to Clipchamp.
- Open Clipchamp
- Select “Your media” from the left navigation menu
- Select “Import files” -> “from phone”
- This generates a QR code that you can scan with your phone.

- Scan the QR photo with the photo application on your phone and open the link.
- Then you can select photos or videos you want to bring into Clipchamp.
AUTO CAPTIONS
Clipchamp provides captioning for videos.
- Open Clipchamp.
- In the top right hand corner, select “Captions” ->”Turn on auto captions”

- Choose caption language and select or un-select option to “Filter profanity and offensive language”

- Select “Turn on auto-captions” to enable the functionality.
RECORD SCREEN AND WEBCAM
Clipchamp makes it easy to record your screen and webcam.
- Open Clipchamp
- Select “Record & create” option from left hand navigation menu.
- Select camera and microphone to use for your recording. You can also use the “Coach” to give you feedback on your recording.
- Click the red record button.
- Select the window you wish to record and select Share.
- The recording starts and you can go through your recording and voice track.
- Click the Red Stop recording button again to complete the recording.
- Click “Save & Edit” which will bring the recording into the media for editing and review.
JUMP CUTS
Jump cuts can increase the emphasis on certain parts of your video.
- Open Clipchamp.
- Pull in the video media in for the video editing.
- Split the video file using the Split icon or “S” on the keyboard at the location where you want the emphasis to be made,
- Then split the video again at the location where the emphasis should stop.
- Place the playhead on the middle clip.
- Zoom in on the clip.
- This will allow for a nice cut in scenes to focus on one part of the video.
SUBSCRIBE PANELS
Clipchamp makes it very easy to add subscribe buttons to your video.
- Open Clipchamp
- Click “Stock video” option from left hand navigation.
- Click the “Subscribe panels” grouping.
- Select one of the subscribe button options that you like best. You can preview the button and animation.
- Drag the button onto your video timeline into where you want the button to show in the video.
- Drag the button itself on the video into the location of the video you want the button to show.
- You now have a subscribe button on your video.
GREEN SCREEN
You can use the green screen background to use the green screen and then replace it with a video or different background.
- With the green screen clip selected on the timeline, select the Filters option on the right hand side.
- Select the Green Screen option
- Set the screen threshold to the right level to remove the right level of noise from the background.
- Close the filters.
- You will see your video with a black background.
- Select the Stock images or video you want to use to fill in the background of the video by selecting “Stock images”.
- Select the “Free to use” option and choose the image you want to fill the black background.
- Drag the image onto the timeline UNDER the other video with the green screen.
- Expand the image so it fills up the video space and matches the length of the green screen video.
- You now have used a green screen effectively in the video.
PICTURE-IN-PICTURE
Clipchamp allows you to easily embed a video (or other media content) on top of another video (or other media content) as part of video editing.
- Add the first video media file onto the timeline.
- Add the second video media file onto the timeline above the original video. In this way, it will appear on top of the second video.
- Select the video clip and adjust the size and position where you want it to play.
- You will see the video on back play while the video on top also plays.
TRANSITIONS + SFX
Clipchamp supports transitions and sound effects between video cuts.
- Click Transitions from the left hand side.
- Select a transition that you want to use.
- Drag it onto the video media file.
- This adds the transition to the video file.
- Click the “Music & SFX” option from the left hand menu.
- Click the “SFX” tab for the sound effects.
- Click the “Free to use” tab and select the audio you wish to use.
- Drag it onto the timeline at the same place where the transition occurs.
- You now have a transition with sound- very neat!
ADJUST DIMENSIONS
By default the Clipchamp videos play in 16:9 dimensions. This can be easily changed to support formats for TikTok and Instagram.
- Click the 16:9 option in the top right corner.
- It will open up a menu with the other dimensions.
- Select the Portrait option, which works well for TikTok and Instagram.
- The video frame has been updated so you will want to update your video to fit the dimensions.
GRAPHIC OVERLAYS
You can add in some great graphics with Clipchamp.
- Click on Graphics from the left hand menu.
- Select “Frames & overlays”
- Select the overlay you want to use- we recommend the “Audio visualizer” or the “Progress bar” and drag it onto your timeline.
- You will now see the overlay on your timeline in your video and can modify the configurations to meet your needs.
MAKE GIFS
You can easily turn a video into a GIF with Clipchamp.
- Open Clipchamp.
- Open your video (it must be 15 seconds or less!)
- Click Export button in the top right hand corner.
- Select the GIF option.
- This will now export the video as a GIF you wan use.
VIDEO STEPS
- 00:00 Introduction
- 00:13 How to get ClipChamp
- 00:30 Example features
- 01:14 Text-to-speech
- 02:39 Import from phone
- 03:06 Auto captions
- 04:31 Record screen and webcam
- 05:51 Jump cuts
- 06:45 Subscribe panels
- 07:37 Green screen
- 09:05 Picture-in-picture
- 09:52 Transitions + SFX
- 11:04 Adjust dimensions
- 11:57 Graphic overlays
- 12:55 Make GIFs
- 13:26 Wrap up

Hi Thank you very much for this jewel, I did not know it
Have a nice day
Michel Tremblay
Envoyé à partir d’Outlookhttp://aka.ms/weboutlook
LikeLike
Thank you, Kevin. Your videos are exceptional. Clearly among the finest on YouTube. …Jay_____________________
LikeLike
Hi Thank you very much for this jewel, I did not know it
Have a nice day
LikeLike
Kevin, thanks for the very good information for clipchamp. I took a powerpoint presentation and converted to a video (MP4). When creating the MP4 it asks seconds spent on each video and the default is 5 seconds. I uploaded the MP4 to the clipchamp media. I have created some text to speech for each slide, but am having difficulty synching both as the speech is typically longer in duration than the video (slides) clip. Any tips for solving this? Thanks
LikeLike
Hi Kevin, can you tell me how to remove clipchamp files from my hard drive on a linux computer please. I am having trouble finding where they are stored and they are filling my hard drive up, thanks Mike Ward Traveler.
I just left this comment on your clipchamp video
LikeLike